Baselines let you track plan vs. actual for a project plan. This gives you an understanding of where your project is currently, compared to where it was when it first started, or perhaps at some other phase gate or key milestone.
Project Baseline
The project baseline in Primavera P6 is the official baseline for your project. It is usually something that is established at the very beginning of your project so that you can compare it to the current state of your project in the future.
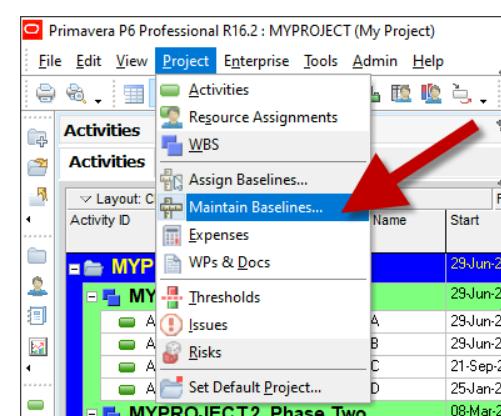
How to maintain and assign your baseline?
- After creating your baseline, go to Project > Maintain Baselines.
- On the Maintain Baselines screen, click Add and then choose to Save a copy of the current project as a new baseline. When you click OK, Primavera P6 will copy your current project and use that to create the new baseline.

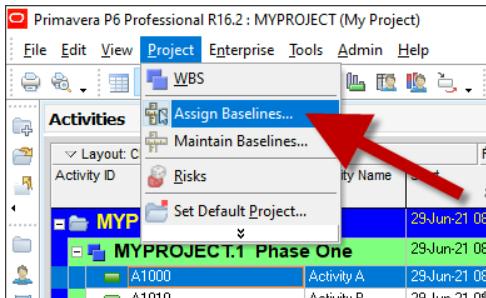
- To assign the baseline, go to Project > Assign Baselines.
- On the Assign Baselines screen, you will see four drop downs for the Project Baseline Primary, Secondary, and Tertiary. In our example, we have only defined one baseline so far. So we will assign it to the Project Baseline by clicking on the drop-down and selecting the baseline that we defined in the previous section.
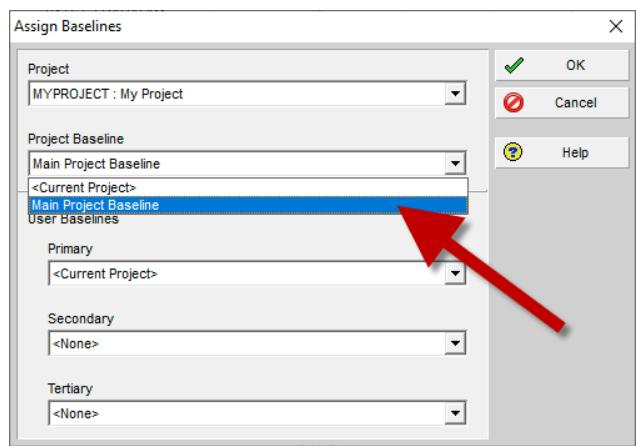
If you have already defined multiple baselines, you can assign them to the Primary, Secondary, and Tertiary baseline slots, as desired.
Displaying Baseline Dates
Once a baseline has been defined and assigned, you can show your baseline dates in the Primavera P6 Activities grid. To do this:
- Right-click in the grid and choose Columns from the context menu.

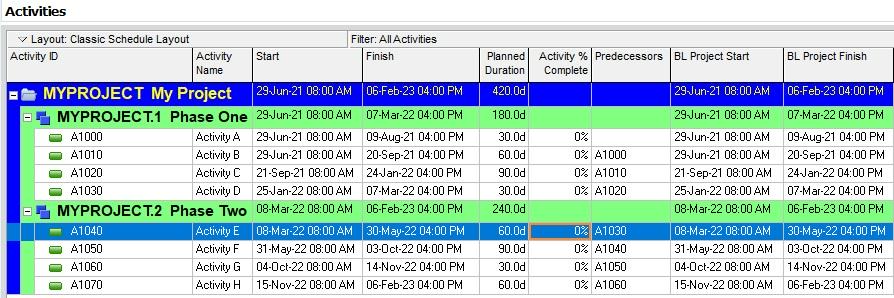
2. On the Columns screen, expand the Dates You will see a list of baseline-related date fields. Select the baseline fields that you need. You can select multiple columns at once by holding down the Ctrl key on your keyboard while left-clicking on multiple columns. In our example, if we want to show the dates associated with the Project Baseline, we should select the BL Project Start and BL Project Finish fields.
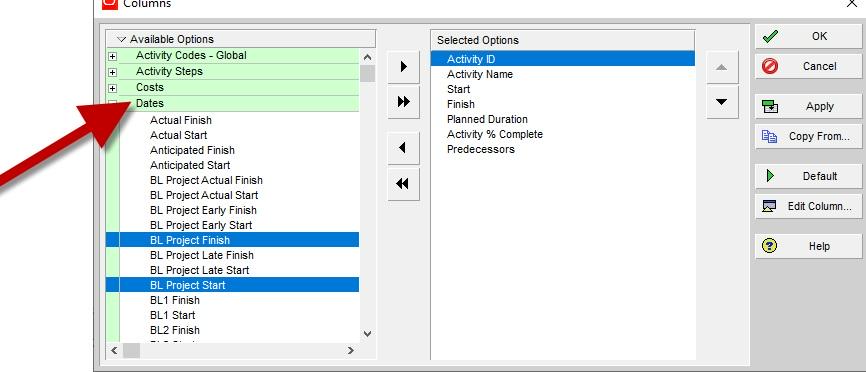
3. Once your desired columns are selected, click the Add to List button to move them to the Selected Options list on the right-hand of the screen. Once the columns have been added, you can use the Up and Down buttons to reorder the columns as needed.
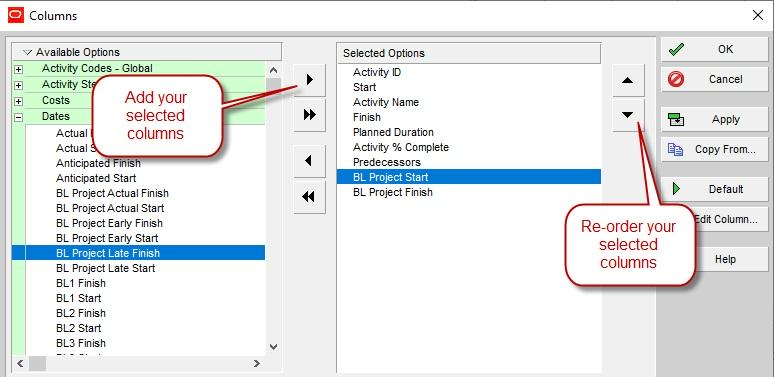
Click OK, and you will see the selected baseline columns appear in Primavera P6.
There are four baseline slots in Primavera P6, and there are four pairs of baseline columns that are associated with each of those slots. Depending on which baseline you are using, the columns that you need to add to the Primavera P6 activities grid will vary:
Project Baseline:
Use the BL Project Start and BL Project Finish columns
Primary Baseline:
Use the BL1 Start and BL1 Finish columns
Secondary Baseline:
Use the BL2 Start and BL2 Finish columns
Tertiary Baseline:
Use the BL3 Start and BL3 Finish columns
OUR SERVICES
CONTACT US

SEYAR AZADANI, PMP
PRESIDENT & CEO
Seyar Azadani has over 20 years of CPM scheduling and construction management experience working with general contractors and project owners, including the USACE, DOT, VA, Meta, QTS, Turner, Donohoe Construction, and Whiting-Turner company. As a Construction CPM Scheduling Consultant, Seyar has provided Primavera P6 CPM Scheduling services for government agencies and the private sector, representing owners, general contractors, construction managers, and architects.
Seyar has proven knowledge, expertise, and experience in utilizing Oracle Primavera P6, Primavera P6 Team Member, Primavera Unifier, Bluebeam, MS Project, Procore, eBuilder, Tableau, Navisworks, and Autodesk Revit. As a project controls specialist, Seyar has assisted Meta and QTS with Data Center projects, including new build projects, retrofit projects, and leased spaces.
Seyar has provided project controls services to projects ranging from civil to industrial to high-rise construction, including hospitals and healthcare facilities, roads and highways, high-rise apartment buildings, and commercial projects, utilizing Primavera and MS Project CPM scheduling tools to create and maintain the CPM schedules for his clients. With the US Army Corps of Engineers projects, as a contractor and construction manager, Seyar has built military facilities, including completing the construction of a USACE training facility, a $200+ million project in the capacity of project construction director.
Seyar has a Master of Science degree in Construction Management from New York University (NYU) in Jan of 2012 and a Bachelor of Science degree in Civil Engineering in 2004.