A project baseline is required to track and compare the progress of the schedule. The baseline is to be assigned to a project schedule before updating the actual progress of the tasks. Once the baseline is set and the schedule is updated, the status of the project can be analyzed to determine whether the project is ahead of schedule or behind schedule.
Set Baseline in MS Project
To set a baseline to a Microsoft project schedule, we need to click the “Project” tab, click “Set Baseline,” and select “Set Baseline” in the pull-down menu.

Once we click “Set Baseline” in the pull-down menu “Set Baseline” window appears with options as mentioned in Figure- 2 below. To set a baseline for the Entire Project, we will select “Set baseline,” “Entire Project,” and click “OK.” Once we click “OK,” the program saves the current schedule as a baseline for the entire project.

Updating a Schedule in MS Project
Before updating the project schedule, we will change the view, add additional columns, and select the “Status Date” as follows. We will click “Gantt Chart,” and select “Tracking Gantt,” to view the baseline bar below the progress bar in the “Gantt Chart.” Then, we will right-click the columns and click “Insert Columns,” and select the required columns as mentioned in the figure below.
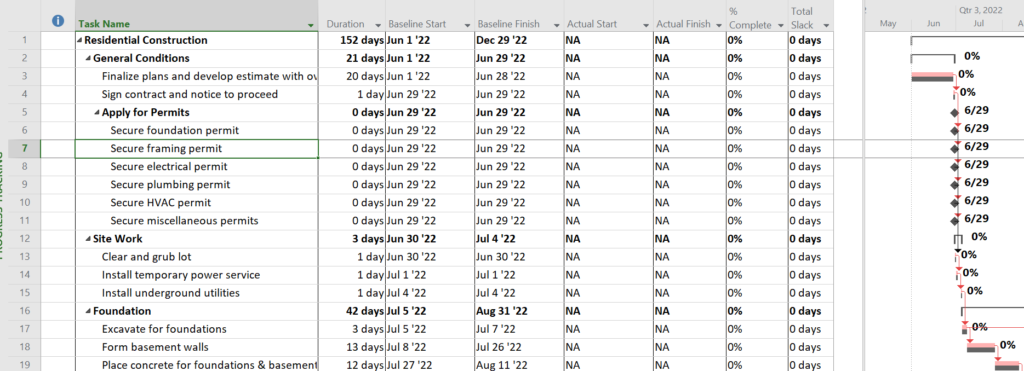
Then we click “Status Date” in the “Project” tab to select the status date which is the cut-off date for the progress update. For instance, we will select 30 July 2022 as the status date for the schedule and click “OK.”

Update Project- Option 1
If the dates for “Actual Start,” and “Actual Finish” are the same with respect to the “Baseline Start,” and “Baseline Finish” and we want to update the tasks with “% Complete,” for the values from 0%, to 100%, we will select “Update Project” with the options mentioned below.
For instance, we will select tasks from ID 1 to ID 9, and click “Update Project” in the “Project” tab. Then in the “Update Project” window, we will select the options, “Set 0% to 100% complete,” “Selected tasks,” and click “OK.”
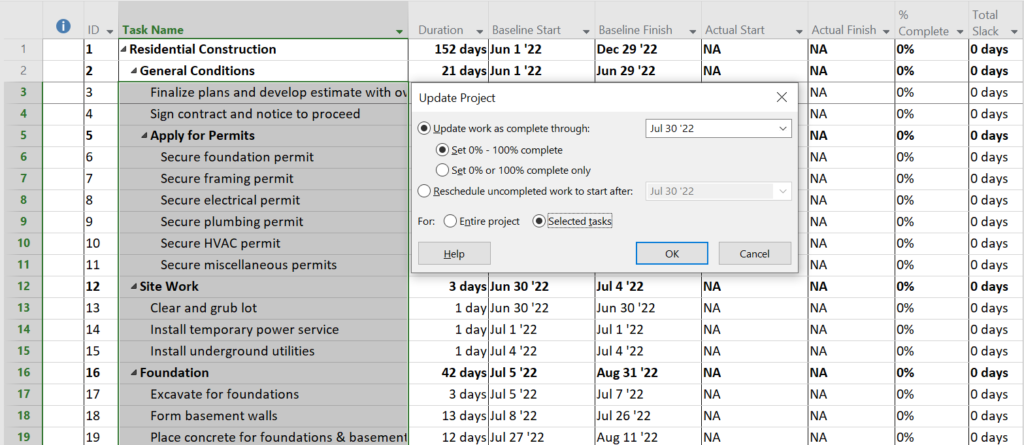
We can see in Figure 6 above, the progress for the above-mentioned tasks is updated the same as the “Baseline Start,” and “Baseline Finish”. Note that the tasks with from ID 1 to ID 9 are updated with progress from 0% to 100 %. Also, the progress bars in the “Gannt Chart” are the same as the baseline bars in the figure below.
We can observe that the “Total Slack” for the “Tasks” in the figure above is 0 days since the progress of the above-mentioned “Tasks” are on track without any delay with respect to the baseline.
Update the Project – Option 2
In the update project option 2, the “Actual Start,” and “Actual Finish” are the same with respect to the “Baseline Start,” and “Baseline Finish” and we will update the “% Complete” with values 0% 0r 100% complete only.
For instance, we will select tasks from ID 1 to ID 9, and click “Update Project” in the “Project” tab. Then in the “Update Project” window, we will select the options, “Set 0% or 100% complete only,” “Selected tasks,” and click “OK.”
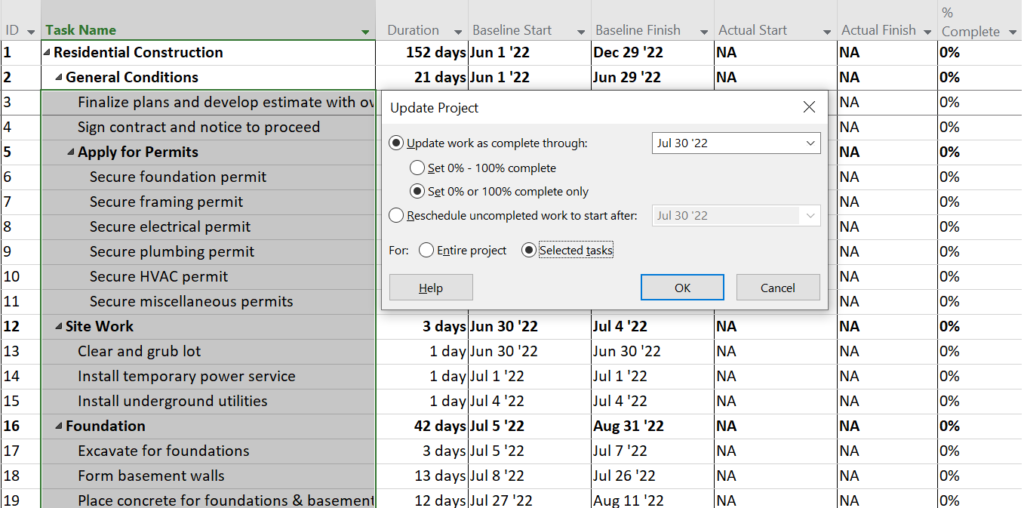
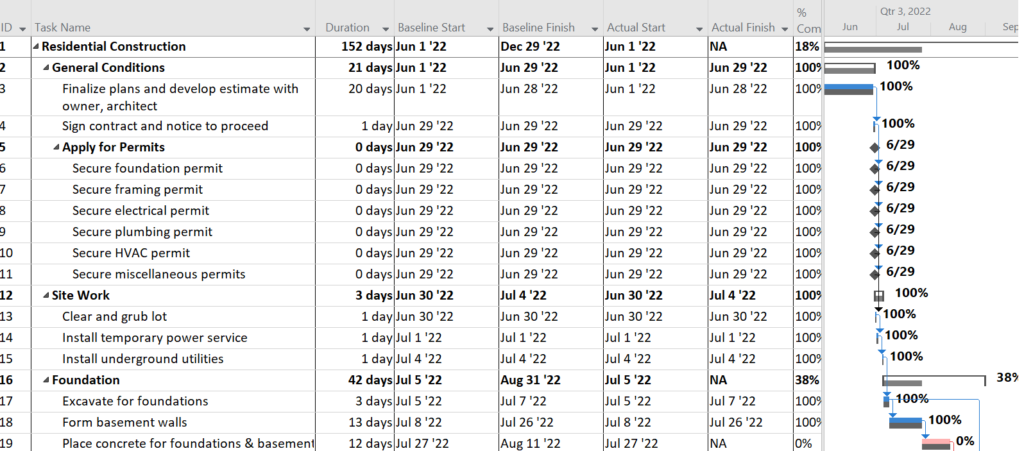
We can see the progress for the above-mentioned tasks is updated the same as the “Baseline Start,” and “Baseline Finish” in Figure 8 above. Note that the tasks with from ID 1 to ID 9 are updated with progress as 0% or 100 % only. Even though the actual start date of Task with ID 9 is updated as 27-July-2022 ( before the status date 30-July-2022), the “% Complete” is updated as 0, whereas it should have been between 0% to 100%.
Update the Project – Option 3
If the “Actual Start” or “Actual Finish” dates are differing from the “Baseline Start” or “Baseline Finish,” we can update the project by manually entering the actual dates and % complete for each “Task.”
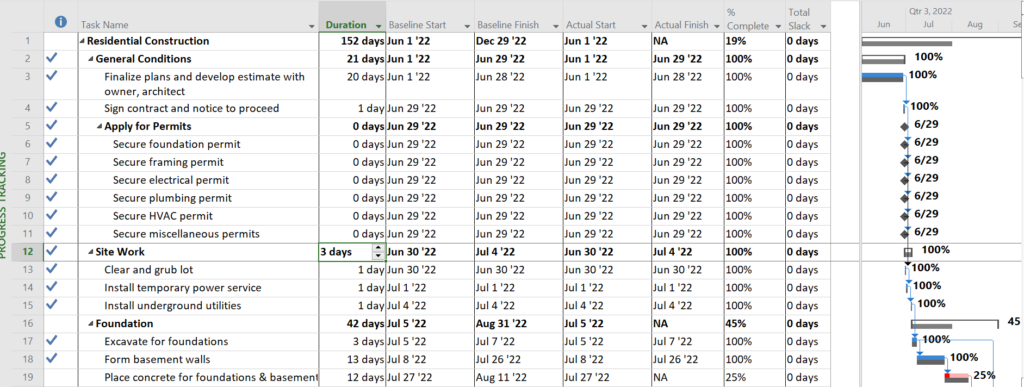
For instance, we will update the “Actual Start,” “Actual Finish,” and “% Complete” manually for the tasks, from ID 13 to ID 18. To do this we will click the respective columns for each task and select the dates for the actual start and actual finish. Then we will enter the actual “% complete.” Note that we will enter the progress data for the sub-tasks only. The “% Complete” for the summary tasks will be calculated automatically based on the data entered for the sub-tasks.

Note that there are delays in the start date and finish dates of the tasks for “Site work” and “Foundation”, with respect to the baseline start and baseline finish date. Therefore, in the “Gannt Chart,” the progress bars are extended beyond the baseline bars. Furthermore the “Total Slack” for the tasks in WBS “Foundation,” is with negative values. In the above-mentioned update, the value of “Total Slack” is -9 days, which means due to the delays in the finish dates of tasks for “Foundation” works, the forecasted delay in the project finish date is 9 days. The negative “Total Slack” is an early indication of the delay in the project, therefore mitigation measures are to be planned to bring the schedule on track and to avoid any delay in the planned project finish date.
Update the Project – Option 4
This option is used to reschedule uncompleted tasks to start after a specific date. For instance, we will select the task “Place concrete for foundation and basement” (ID 19), select the “Reschedule uncompleted work to start after” option, enter the date as August 15, 2022, and click “OK.”
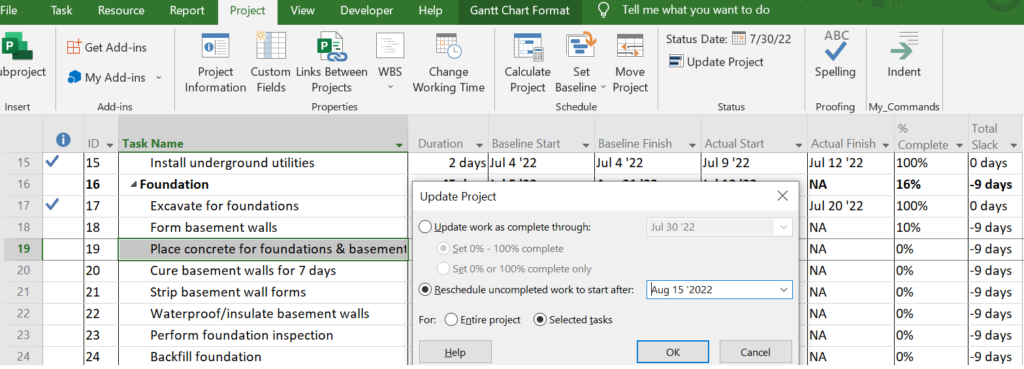

Note that once the project is rescheduled with the aforesaid option, for a selected task “Place concrete foundation & basement,” the start date of the task is shifted to 15-Aug-2022. Also, the “Total Slack” is increased to -13 since the start date is delayed further.
Update the Project – Option 5
To update all the activities in the schedule from the project start, up to the status date, we can use the “Entire Project” option. To do this we will click “Update Project” in the “Project” tab. Then in the “Update Project” window, we will select the options, “Set 0% t0 100% complete,” “Entire project,” and click “OK.”
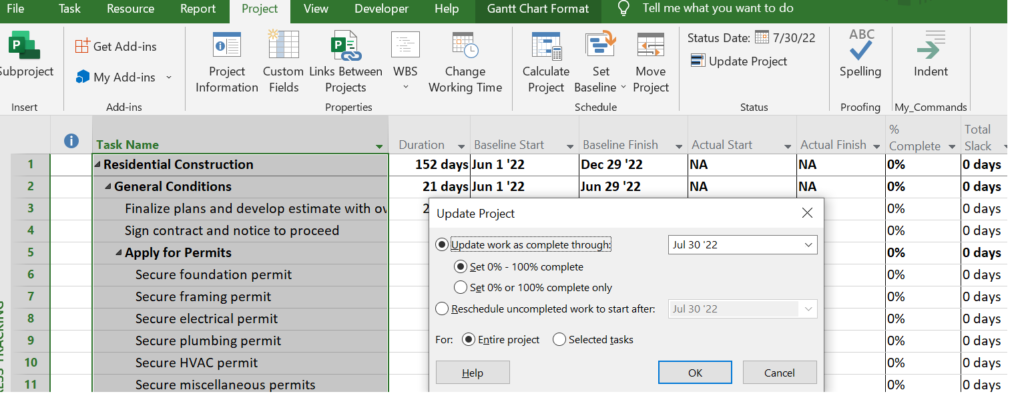
Once we update the project with the aforesaid option, the tasks will be updated with “Actual Start,” “Actual Finish,” same as the “Baseline Start,” and “Baseline Finish,” as shown in the figure below. The “% complete” will be updated to “Scheduled %” with respect to the baseline dates.
Conclusion
The project schedule can be updated with multiple options in MS Project as illustrated above, based on the actual status of the progress and the constraints for rescheduling the uncompleted tasks. Contact Leopard Project Control today for Baseline Scheduling Services.


