INTRODUCTION:
Critical Path Method (CPM) is the most widely used planning technique and is often referred to as critical path planning. This planning technique is used to plan and manage a Project and calculates the minimum lead time for a Project along with the possible start and end times for the Project activities.
CPM is still a cornerstone of Project planning today. How long a Project lasts often depends on its main tasks. There shouldn’t be any delay in the critical path of project activities. Any delay in the single activity of a critical path results in a delay of the whole project by the same proportions. An important concept to understand here is that there is practically no float available in a critical path. Float is the relaxation of time available in the schedule such that a delay in a similar proportion to the available float doesn’t delay the project.
1. IDENTIFICATION OF CRITICAL PATH IN PRIMAVERA 6
When you have done your basic planning part of the Project in Primavera as mentioned in our article https://consultleopard.com/creating-a-new-project-in-oracle-primavera-p6/, follow the number of steps below to identify the critical path.
- First, press F9 and then click the Options button.
- Find the Option “Define Critical Activities as”. Choose the Longest Path or Total Float less than or equal to 0.
- Click on the Schedule button.
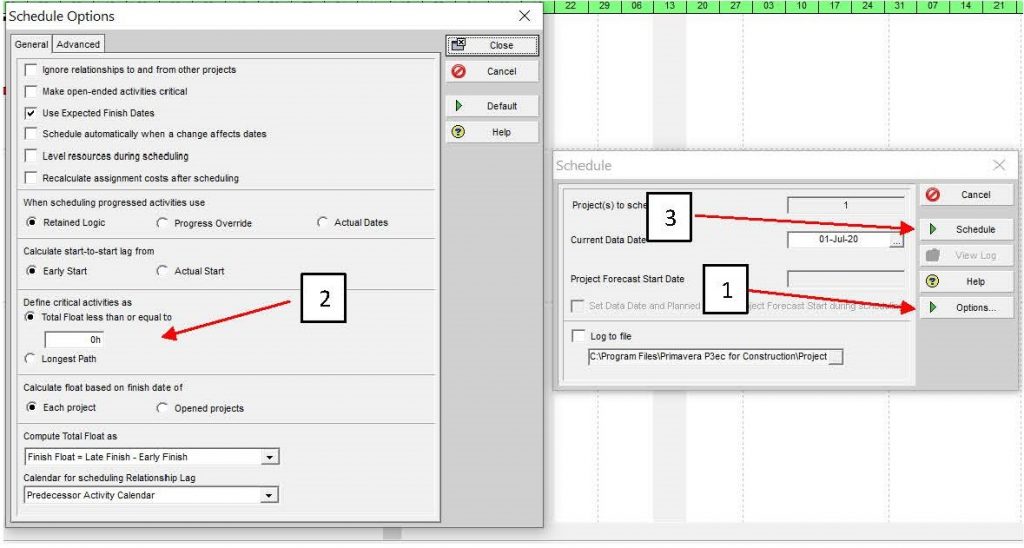
Now notice the Gantt window as shown below figure. You should now see a red Critical Path automatically.

The filter can also be a fast and helpful way to clear your critical path. Click the Filters button to enable the critical path filter as below figure. There is also a filter for the longest path. This only shows the critical activities. (Filter>Critical>Apply>OK)

The image below clearly displayed the Critical Path after you have clicked on the Apply tab.

2. ACTIVITY RELATIONSHIPS
Follow the next steps in the chart to assign proportions to the prepared activity Name A, B, C, D, E, F, G, H, and J items in the sample Project.
(Click on Detail>Relationships>Select the activity>Predecessor)

Now highlight existing activity to continue, and then select the Relationship tab and follow the four steps shown in below. To add the following dialog box, select the icon to add a sequel as the following images.

Then you have to choose any suitable relationship according to the requirement of your project from the Relations drop-down button as shown below.
Finish-to-Start (FS):
This is the most common type of relationship used in Primavera, it means that the successor activity will start after the predecessor activity is completed e.g. when you have to start plasterwork on a wall, the activity prior to it i.e. brick masonry should be completed.
Finish-to-Finish (FF):
This relationship shows the parallel nature of works so that the successor activity will finish with the finish of predecessor activity e.g. to complete the two different modules in your new device to proceed to the next step.
Start-to-Finish (SF):
This relationship means as soon as the successor activity starts, the predecessor activity can finish. For example, the approval of design activity shall be completed, when you are starting the procurement of the material.
Start-to-Start (SS):
This relationship means that the successor activity will start with the start of predecessor activity e.g as soon as you start the excavation work of “Building A” (Predecessor Activity), the excavation work of “Building B” can also start.

WHAT IS FLOAT
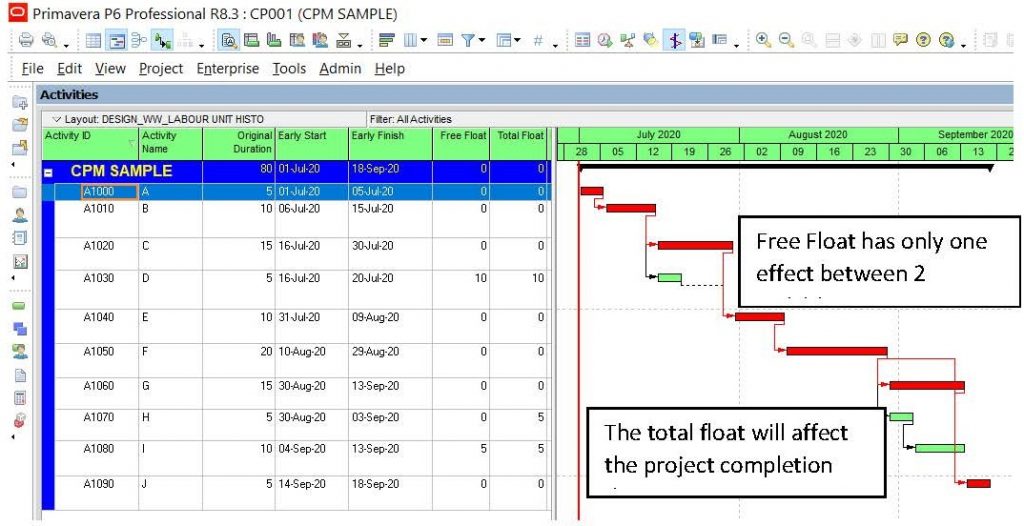
In Primavera P6 there are two main values such as Total Float and Free Float.
Total Float is the time to the extent an activity can be postponed without the project completion date being postponed. Free Float is the amount of time an activity can be delayed without delaying its Successor Activity Finish Date.
Now we will explain this concept in our pilot project as follows:
3. FORWARD PASS & BACKWARD PASS
The chart below explains the differences between Forward Pass and Backward Pass clearly.
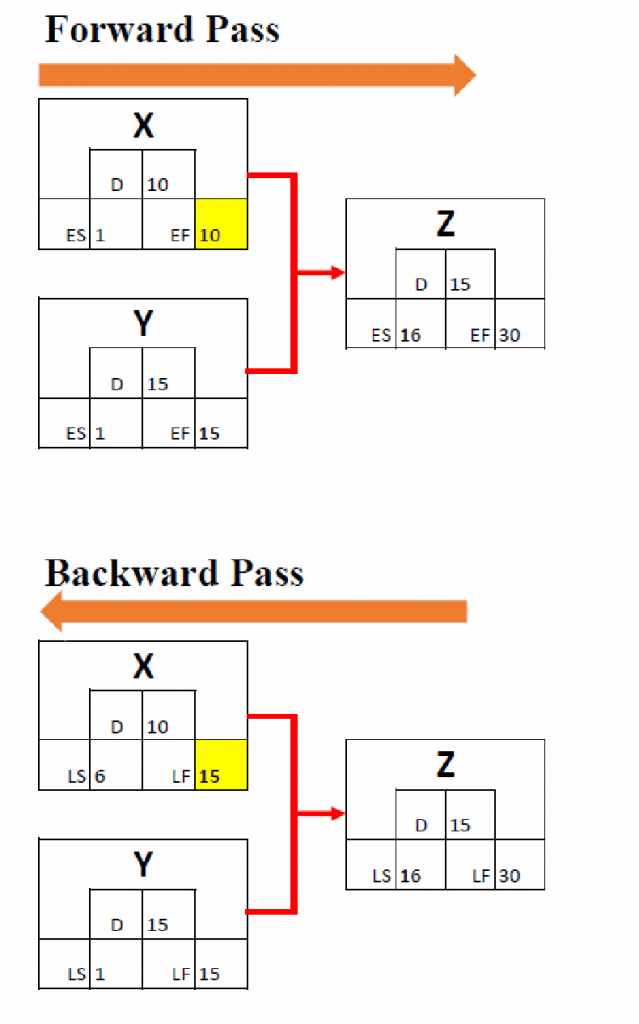
The same theory of how to involve Primavera will be explained in the next two sub-topics.
4. FORWARD PASS
Forward Pass is calculating Early Start and Early Finish. Also, follow the charts below to see this concept in Primavera.


5. BACKWARD PASS
Backward Pass is calculating Late Start and Late Finish. Get a clear idea of this concept, follow the diagram steps below.


In Backward Pass, the Late Start of successor (Activity ID A1040) will be the base to calculate Late Finish of the predecessor (Activity ID A1020 and A1030)
LONGEST PATH AND CRITICAL PATH
It is widely accepted in many industries that identifying and following the longest path of a Project is the best way to keep your Project deadline in view and CPM scheduling is used to keep the most important tasks’ deadline in view.
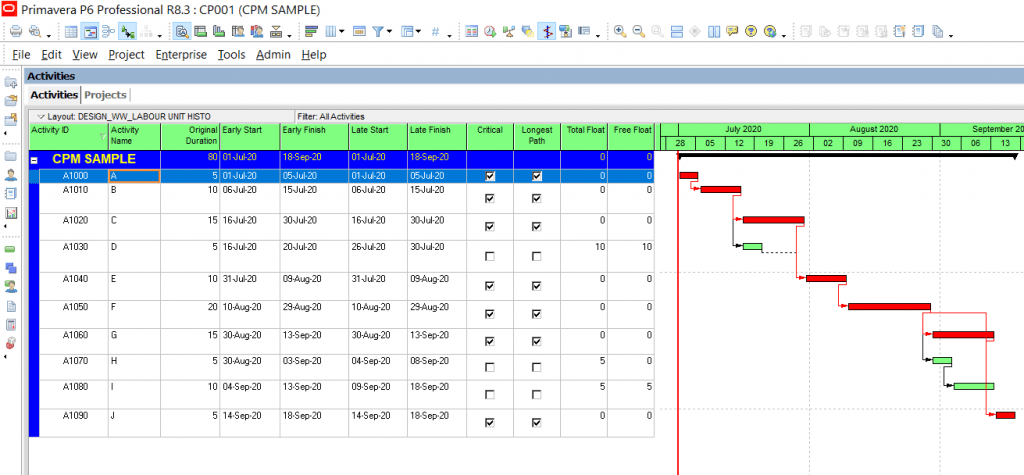
Primavera P6 gives you these two options when you show your critical path on the Gantt chart:
- Either display the path of 0 Total Float, or
- Display the Longest Path.
Below in Figure is a demonstration of those two options.
(Click F9>Schedule>Options>Define critical activity)

6. MULTIPLE PATHS IN PRIMAVERA P6
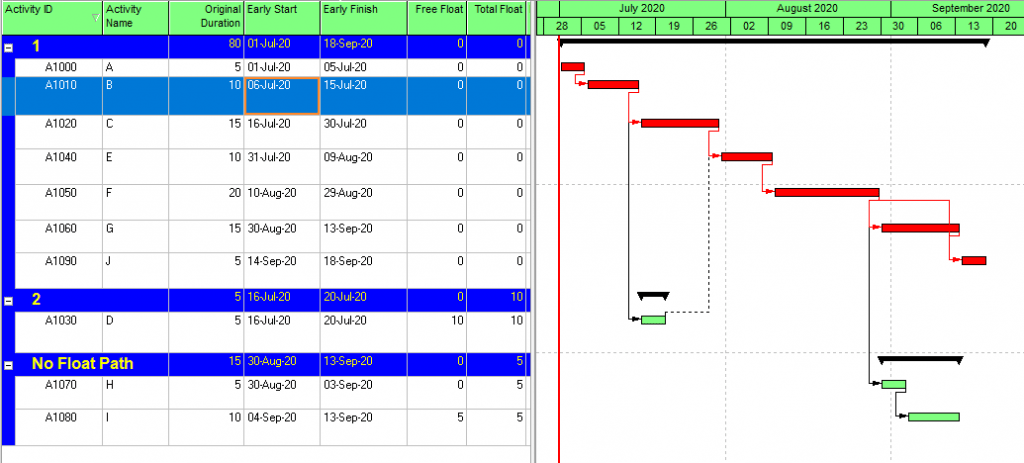
When filtering a critical path in Primavera P6, it shows only one critical path. In a complicated project, we may need to show a more “near-critical” path.
Now we show you how to do this. To do that, reuse the same pilot project and follow the following steps in below diagrams.
Now click on F9 in the Keyboard, then click on Option in the following figure.

In “Display multiple float paths ending with activity”, select the last activity as example activity J.Now click the “Advanced” tab, then check on “Calculate multiple float paths”.
Choose the number of paths you want to display. In our case: 2 paths.

Now Click Close and Schedule.

After that, Right-click on the activity table, click on Group & Sort as follows.

Now, choose Group By “Float path” and click OK, according to the following diagram.

Finally, Primavera will show you Two number of critical paths as following: Now, choose Group By “Float path” and click OK, according to the following diagram.
Path 1 : A B C E F G J
Path 2 : A B D E F G J
CONCLUSION:
One thing that should be kept in mind is that the higher the number of Critical Paths, the more risk will be involved. Each activity of all the critical paths shall not be delayed, otherwise, the whole project will be delayed.
Contact Leopard Project Controls for your next construction scheduling project!
In this article, we have explained the advantages of the Critical Path Method (CPM), Activity Relationships, Float (forward and backward pass), and Different Paths in Primavera P6. Also, I did an in-depth analysis of the Pilot Project in Primavera 6. This article will help prepare a Project Schedule with the best technology and Track the Project up to the deliverable phase.
We recommend using this Critical Path Planning Method and achieving successful results in Construction and Engineering Projects, Manufacturing, Software development Projects, Utility, Public sector, Defense, Oil and gas industry, Aerospace engineering Projects, etc.


