Introduction
This approach allows the team to lead the project, break it down into different stages, continue to work with stakeholders, and continuously improve and reverse each stage. This process is called Agile Project Management. The process begins by explaining how the customer uses the product and the problem it experiences. Thus customer expectations are utilized as input in the project. Once the work has started, it goes through team planning, implementation, and evaluation processes and the results can be linked to the client’s expectations. Continuous collaboration between team members and those involved in the project is needed to make informed decisions.
How to do Agile Planning in Primavera P6?
The biggest challenge with this complex project management technique is that you often do not know the details of the work at the start of the project. However, you need to plan it based on the available data. At a later stage in the project, you may need to include further details into the existing program without changing the original concept of the baseline program.
In this case, this set of detailing activities introduced later in the phase serves as a concept of an Agile schedule. This process is explained in the following five steps by using the Primavera P6.
Step 01: Selecting an existing schedule
First, we need to identify the method of setting up an Agile schedule by using Primavera P6. In this case, take the baseline program as in the following example, Figure 01.
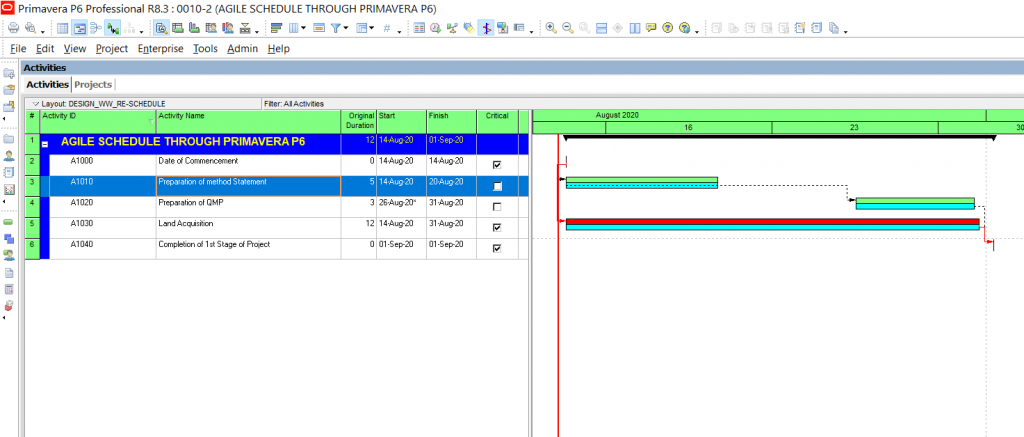
Figure 01
Step 02: Breaking of selected activity up into several stages as per the Agile concept
To perform this step, select the required activity for example ID no. A1030 “Land Acquisition”, Figure 02. Then add new activities based on customer or project requirements. In this demonstration, we added five new activities to the existing programs A, B, C, D & E.
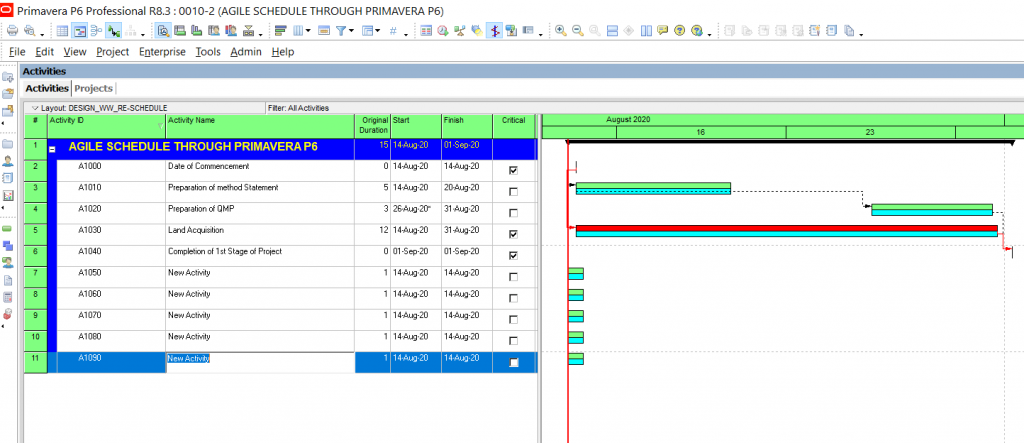
Figure 02
To get the view of Figure 03, rename the five new activities as A, B, C, D & E.
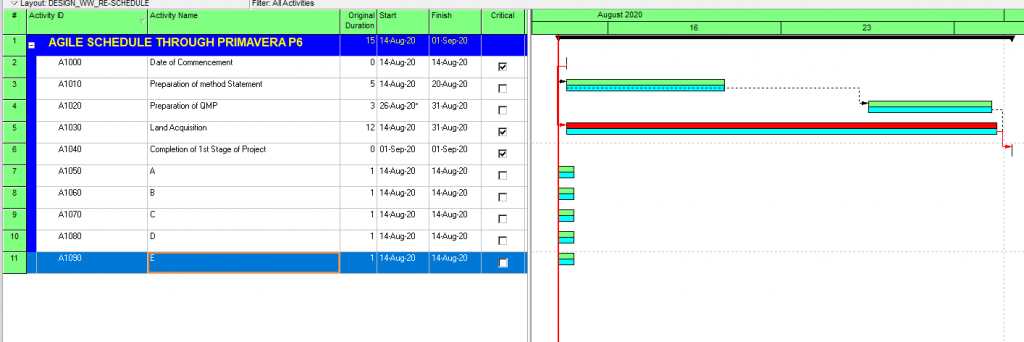
Figure 03
In addition to the activity name, the activity ID must also be renumbered in accordance with Figures 04 & 05.

Figure 04

Figure 05
Step 03: Linking of Agile activities/fragments into the existing selected main bar or to Placeholder activity (Our example ID No. A1030).
Now you must link activity A to E by using the relationship of FS as per Figure 06.

Figure 06
After that, reschedule the program as per Figure 07 and obtain the Grant chart, figure 08.

Figure 07
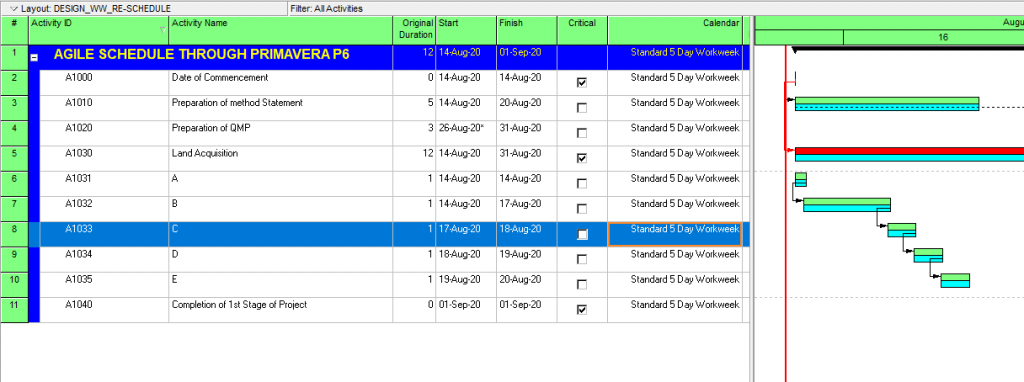
Figure 08
Now identify the existing relationship with the selected Placeholder activity (ID No. A1030), Figure 09.
- Predecessor A1000 FS
- Successor A1040 FS
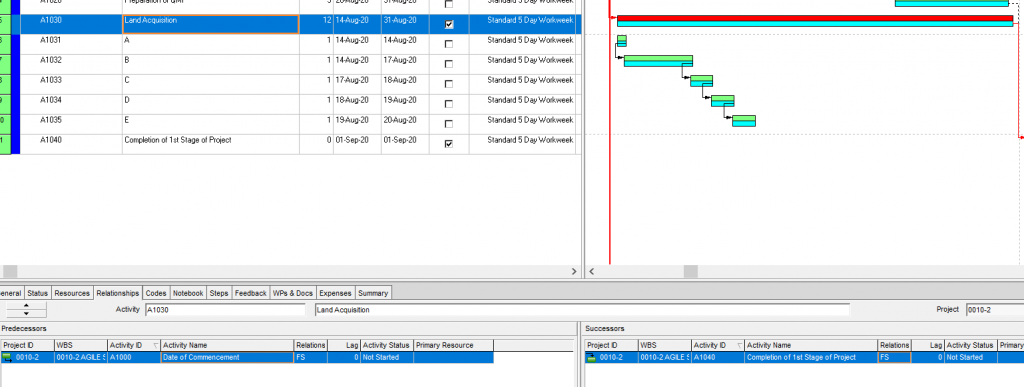
Figure 09
Now it is time to link activity “A” to the “Commencement Date” of the predecessor as A1000 FS is the same as the Placeholder activity, Figure 10.

Figure 10
In the same way, link the activity “E” to “Completion of 1st Stage of Project”, figure 11.
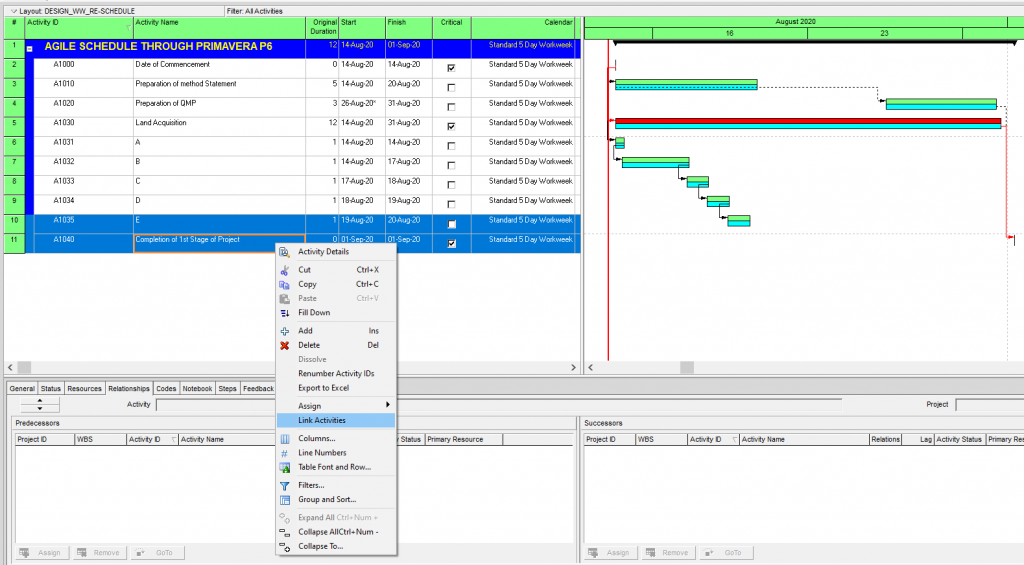
Figure 11
After that reschedule as per figure 12 and get figure 13.
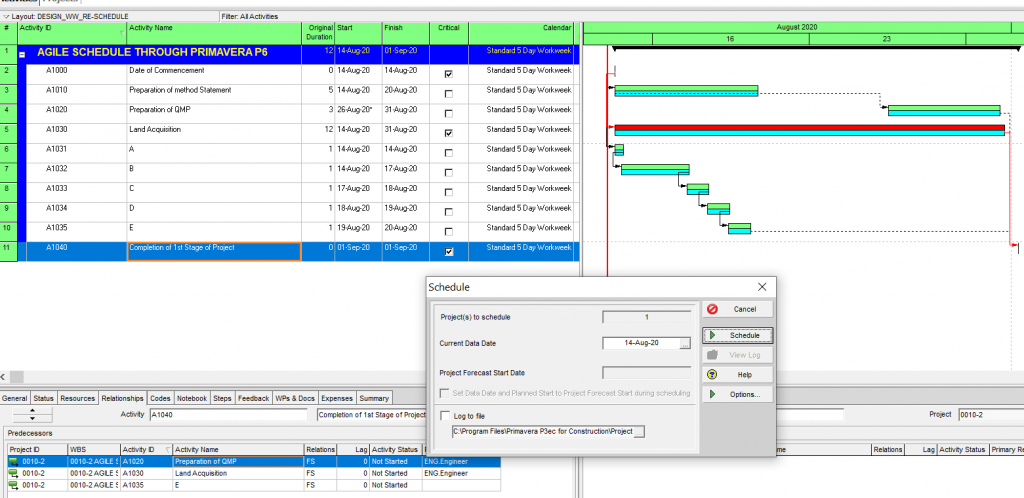
Figure 13

Figure 12
Step 04: Allocate the required duration to the Agile schedule
According to the available data or known details, enter the duration of the activity as for example 3 days, 2 days, 4 days, and 2 days in the respective activities from A to E, Figure 14.
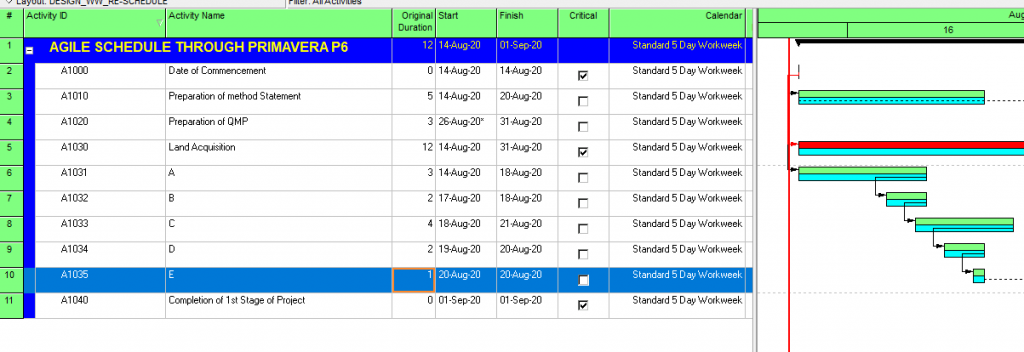
Figure 14
Again, reschedule as per Figure 15 and obtain figure 16.
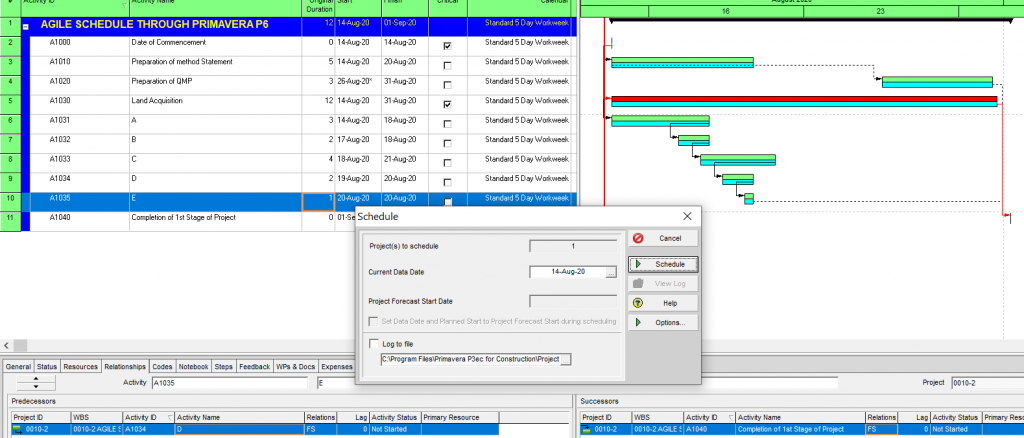
Figure 15

Figure 16
Step 05: Setup of Linking on Activity ID A1030 (Level of Effort).
You must assign the following link to activity ID A1030 as shown in Figure 17 to operate of Agile concept.
Successor Activity “A” by SS relationship and Successor Activity “E” by FF relationship.
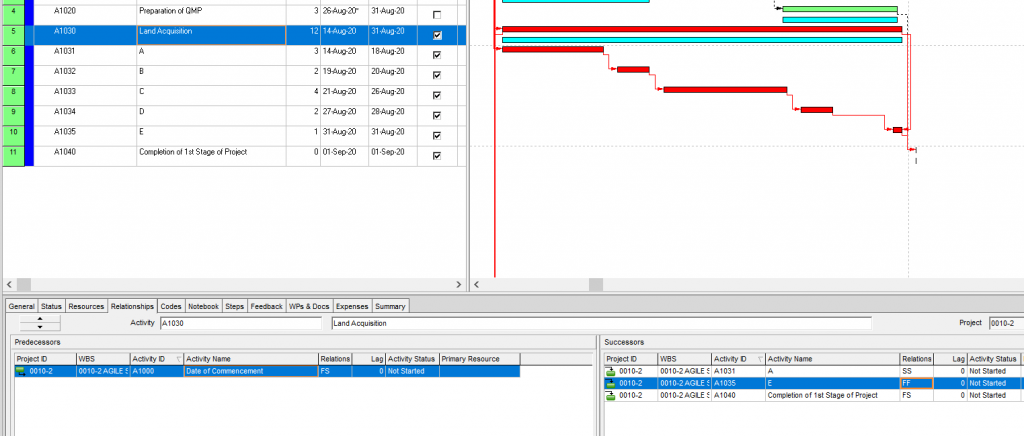
Figure 17
Now you need to change the activity type from task-dependent to Level of Effort on activity ID No. A1030 in the Activity Details window, General section, Figure 18.

Figure 18
Finally, you must reschedule the current program and obtain figure 19.
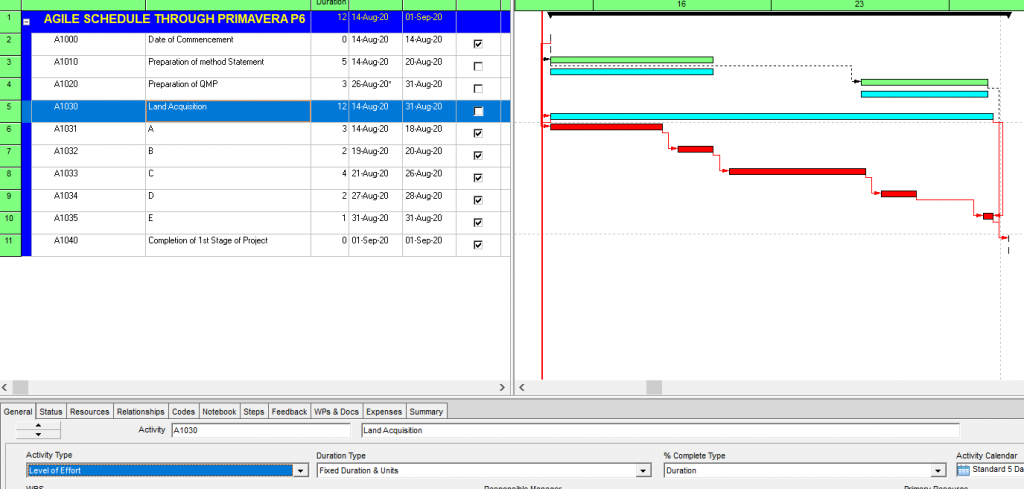
Figure 19
Well done! you have almost completed the Agile schedule through Primavera P6.
You can notice that the original Critical item of ID No. A1030 change as Level of Effort activity, figure 19. Hence, at Agile activity names of “A” to “E” are driving Activity ID No. A1030. Finally, as per the practical situation, you can change the activity duration in Activity “A”, “B”, “C”, “D” & “E” and reschedule and observe the automatic change of duration of “Level of Effort activity” at Activity ID No. A1030. This incident will be explained in the following figures 20, 21 & 22.

Figure 20
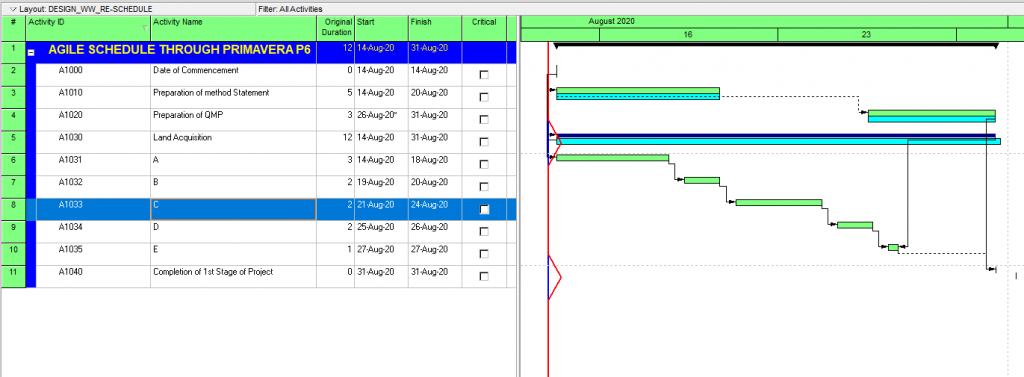
Figure 21

Figure 22
We recommend that you enter a random activity duration for new activities (A, B, C, D & E) and see the automatic color change of activities and total duration at the Level of Effort bar (Act. ID No. A1030), figure 21 & 22. Because of this Agile Schedule, it is distributed to track in detail with the baseline activity ID A1030 without removing it from the baseline plan.
Note that the project’s Critical path now no longer contains the Placeholder Activity / Level of Effort bar (ID A1030) displayed in the ID A1030, as it originally did. The critical path now runs through the Agile Schedule as it should. And we can continue to compare the original baseline schedule with the Agile schedule in Primavera P6.
Summary
You can use the Agile planning process in Primavera P6 as mentioned above to help you gradually develop a project schedule at a later stage with more details, not only because you understand the work better, but the closer you get to completing the work. Again, we think the biggest benefit of this approach is that your current project activities can be tracked with the same baseline activities. The customer also does not have to wait for the project to end to benefit from the project. This concept can be used for any kind of project management work.


